Upgrading Model Power Heavyweight Passenger Cars

Last week I wrote about the steam shuttle to Many Lost Ways National Park.

IMG_2506[1]

I built this train a few years ago, before MicroTrains and Walthers introduced their very nice heavyweight passenger cars. My options at the time were brass car sides or these units from Model Power.

The Model Power cars have serviceable carbodies, but the lettering, running gear and couplers left a lot to be desired.

Bodywork and Paint

The most noticeable drawback to the carbodies was the lack of any steps. I remedied that by cutting the entire platforms from the ends of a couple of cheap cabooses I bought from the junk bin at my local hobby shop. With some careful filing, I was able to neatly fit these beneath the vestibules on both ends of the parlor car and the passenger end of the combine.

IMG_2518[1]

On the baggage end of the combine, I cut bits of ladder from an old bridge kit and glued them in place as stirrup steps.

IMG_2520[1]

The car ends had poorly molded brakewheels next to the diaphragms. I removed these with a sharp hobby knife and filed the area smooth.

Next I thoroughly cleaned the models and sprayed them Bomber Tan. After the paint dried, I lettered the cars for the Four Corners, one of the predecessor roads to the FCFL.

I brushpainted the diaphragms and other details, then lightly weathered the cars with weathering powders.

IMG_2529[1]

Interiors

I removed the plastic interior inserts with molded seats and sprayed them dark red. I then added a handful of passenger figures, trimming their legs and torsos to fit as needed.

IMG_2526[1]

I made a paper template of the window openings and used it to cut strips of manilla file folders for window shades. I glued these to the inside of the window glazing.

IMG_2524[1]

Running Gear

I discarded the Model Power trucks and replaced them with MicroTrains trucks.

The trucks came with plastic inserts that fit neatly in the factory truck-mounting holes. The inserts are pressed in from above, and the mounting pin is pressed in from below, holding the truck in place.

IMG_2525[1]

The trucks come with couplers that are supposed to be mounted on a tab with a long slot in it. A small screw is supposed to go through the slot, making the coupler adjustable. I wanted the cars to couple more closely, so I trimmed the tab about 1/16″ and glued the couplers in place with CA. This works for my short train, which doesn’t put much stress on the couplers.

IMG_2522[1]

IMG_2527[1]

Close coupling!

I’ve since acquired a couple of the newer, higher quality heavyweights – I’m proud that these look pretty good alongside them.

IMG_2528[1]

Steam Service to Many Lost Ways

Several years ago I had the privilege of taking the Agawa Canyon Tours/Algoma Central “Tour of the Line” from Sault Ste Marie to Hearst, Ontario and back. Riding this amazing little train was one of my all-time favorite railroading experiences.

Here’s how I try to capture it on the FCFL:

IMG_2506[1]

As the Agawa Canyon Tours website says, their “Tour of the Line” train is:

“…a unique service that picks up and drops off passengers at any point along the line. Sometimes called the milk run, you could stop for any number of reasons on your journey. From people heading to their private camps, a wilderness lodge getaway, fishermen, canoeists, kayakers, ATV’ers or snowmobilers, our passenger service provides an ideal way for people to access the recreational wilderness of Northern Ontario.”

The heart-stopping scenery aside, the train was great fun for the hodgepodge of people hopping on and off at unmarked stops in the middle of the wilderness, loading and unloading the most absurd northwoods supplies.

The little consist I rode was headed by an EMD F7 pulling a baggage car and two coaches of similar vintage. One of the coaches had a small lunch counter with cold sandwiches and snacks, but if you knew the right people the train crew appeared to be willing to let you heat your pasties over their charcoal grill up in the baggage car. It was that kind of operation.

My version of the wilderness milk run takes passengers deep into the backcountry of Many Lost Ways National Park. The journey starts at Flagstaff, AZ with scheduled stops at Herbst Junction and Salvation Point before terminating at Durango, CO.

Power

I wanted to include steam in my fleet, and this seemed like the perfect place. The wilderness shuttle is powered by a Kato USRA Light Mikado. This was Kato’s 20th anniversary version numbered 1986.

IMG_2489[1]

Four Corners 1986 waits its turn for sand and water at Salvation Point.

I converted the locomotive to DCC with a Digitrax DN163 mounted in the boiler – a rookie move. The boiler-mounted decoder replaces crucial weight, and significantly reduces traction – someday I’d like to upgrade to a tender-mounted sound decoder.

I disassembled the loco and tender and painted over the Kato markings, then applied “Four Corners” decals and some weathering powders.

The Four Corners was one of the “fallen flags” that merged to form the FCFL, and having this “heritage” piece on the layout helps bring that history to life.

I imagine the locomotive is owned and maintained by a volunteer group that receives significant corporate support from FCFL. I plan to include a facility for them when I build the Flagstaff addition to the layout.

Baggage

The kind of stuff I saw loaded on the Agawa Canyon trip hardly qualified as baggage. There were ATVs and small boats and even some lumber on board. I felt like an old boxcar was more up to the task than a baggage car.

IMG_2509[1]

I disassembled a MicroTrains 40-foot steel boxcar and painted it primer gray, then coated the sills, doors and car ends Inland Sea. The roof I painted silver. I then lettered it with homemade decals representing the Five Lakes Railway, the other fallen flag that makes up the FCFL. (For more on homemade decals, read this.)

The baggage people bring on this kind of train is a huge part of the story, so I wanted to include the freight in the model.

I made a couple of coolers from scraps of styrene, painted them, and glued them to the floor of the car just inside the door. On top of the coolers I piled several pieces of luggage I sculpted from bits of Play-Doh (read more on Play-Doh luggage here). Deeper in the car I glued a Plastruct boat and a couple of Gold Medal Models photo-etched metal bicycles.

IMG_2495[1]

Backcountry baggage includes coolers, backpacks, tents, bicycles and an old rowboat.

IMG_2503[1]

Next Week – Turning Model Power heavyweight passenger cars into backcountry palaces on wheels!

IMG_2494[1]

ModelStory: Darn Good Soup (inspired by actual events)

It’s soup season in Many Lost Ways National Park. The nights are cold and the days are gray, and the hearty winter campers are fortified by gallons of sturdy soup – freeze-dried chicken and rice, canned vegetable beef, and one very special batch of frozen, homemade split pea with ham.

It was brought by a young couple who, in a stroke of efficient genius, decided to use it rather than ice to keep their cooler cool. I watched them board the steam train at Salvation Point for a long Valentine’s weekend in the park: Two large backpacks, one tightly rolled tent, one sleeping bag, one large cooler on wheels.

They hefted it all up into the baggage car together, high-fived, stole a kiss.

soup

“They hefted it all up into the baggage car together, high-fived, stole a kiss.”
(Woodland Scenics figures with aftermarket winter clothing added, custom-painted Micro-Trains 40-foot steel boxcar, Play-Doh luggage, scratchbuilt styrene coolers.)

They don’t know it yet but this trip will be their last as a young, carefree couple. Not long after they get home, she’ll find out, then tell him:

“I’m pregnant.”

There will be excitement and fear unlike anything they’ve known before.

They’ll bump along through the not-easy process of growing a family, and they’ll know the immeasurable joy that comes with all that pain.

They’ll never have the time for each other that they do now.

They’ll think back on the life they have now – the seemingly grown-up-enough work of paying the bills and looking after each other – and wonder how they filled the hours.

They’ll have thousands of sunny days. Take dozens of family trips more fun than this one. Eat lots of extraordinarily good soup.

But they’ll never again taste anything like the split pea with ham they brought on that last trip when it was Just The Two Of Them.

4 cups chicken broth

4 cups water

16-oz dried split peas

1 large ham steak, cubed

1 large onion, chopped

6 or 7 carrots, thickly sliced

1 tablespoon minced garlic

1/2 teaspoon nutmeg

2 cinnamon sticks

12 whole cloves

Salt and fresh-cracked black pepper to taste

Combine ingredients in a large pot over high heat until boiling. Reduce heat and simmer on low for 2-3 hours, stirring regularly.

(Love ya, Nik.)

Grade Crossing and Block Signaling 101

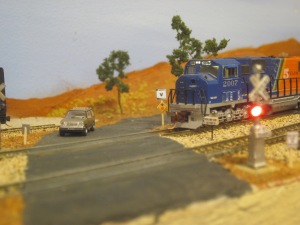
Last week I wrote about the grade crossing with working lights The Superintendent and I added.

Electronics are not my thing. Ohm’s law? Amps versus volts? I don’t know what’s watt.

Thankfully the FCFL’s signals chief, AKA my Dad, is an electrical engineer. Here’s Dad on how we made the grade crossing lights work, with a bonus on an occupancy detector for a hidden stretch of track:

FCFL Railway signaling

The FCFL Four Corners Division traverses sparsely populated areas of the Southwest. Given the long distances between stations with few crossings and relatively little vehicular traffic most of the division operates “dark,” that is without centralized traffic control or automatic block signals. Most of the rural grade crossings are protected by stop signs warning road traffic to watch out for trains.

Grade Crossing Signals

signs and grade crosssing 037There are two ways to detect trains and actuate grade crossing signals. One is to detect the locomotive current. The other is to use photocells that detect the light change when the train passes over them.

Detecting locomotive current is simpler and doesn’t depend on room lighting for operation. However, the signal operation isn’t prototypical in that a long train may still be in the crossing when the locomotive exits the block and turns off the signals.

The photocell system provides more prototypical operation by starting the signals flashing before the train reaches the crossing and turning them off once the train is clear of the crossing.

IMG_2464[1]

Photocells are mounted between the rails and flush with the ties. When a train passes over the photocells, the grade crossing signals are triggered.

The Logic Rail Technologies Grade Crossing Pro was chosen for this application. The Grade Crossing Pro module uses four photocells, two on each side of the crossing to detect the train, and has outputs to drive the flashing lights as well as an output to drive a switch machine to actuate gates, although gates weren’t installed for this crossing.

One complication with this crossing is that there are two tracks and trains can be on either or both tracks at the same time and be moving in either direction.

The way to handle this situation is to use two Grade Crossing Pros.  One acts as a slave unit that only detects the train on it’s track and sends a signal to the master one to actuate the lights.

A DC power supply is needed for these units.  A Radio Shack 110 Volt AC to 12 Volt DC “wall wart” power supply was used to power the grade crossing electronics.

The signals work well, even when the crossing is the site of a meet between two trains:

Occupancy Detector for Hidden Track

Between Herbst Junction and the Flagstaff staging area there is a 25-foot stretch of track where the train isn’t visible.

IMG_2466[1]

This headhouse is the eastern end of a 25-foot tunnel. A block detector was installed to alert operators when a train occupies the unseen trackage.

Automatic block signals were installed in this section to provide an indication that the block is occupied.

A Circuitron BD-2 Block Occupancy Detector was used to detect the train and drive the signal heads at each end of the block.  This is a self-contained unit for one block. It detects the train by sensing the current drawn by the locomotive when it is in the block and has outputs to drive the Occupied/Clear signal aspects.

IMG_2465[1]

A westbound train enters the tunnel, and the signal head indicates the block is occupied.

IMG_2467[1]

Twenty-five feet to the west, the train exits the hidden trackage, and the signals show all clear.

Beyond the block occupancy detector module, the signal heads, and about 50 scale miles of wire, the only requirement is the Radio Shack 12 volt supply used for the grade crossing signals.

There is a small voltage drop in the track power going through the occupancy detector.  To compensate, back to back diodes are connected in the power supply to the rest of the layout so there isn’t a sudden change in voltage as the locomotive enters or exits the block.

IMG_2554[1]

Mission Accomplished: Happy Kid.